Making of PC-09: The Wizard of Cos
Written by GRX (code, tech and production related),
Response (paragraph about the music) and Zonbie (art related)
PC-09: The Wizard of Cos placed 3rd in the PC Demo competition at Revision 2014.
The first ideas for the latest PandaCube Demo were bounced forth and back in the fall of 2013. But the actual Storyboard only got created in the end of January 2014. Proper production started mid-February 2014 and the bulk of the Demo was created in about 10 weeks. Like in the previous years we ran massively out of time and ended up working on the demo right up to the deadline at the Revision party.
The first idea for this demo was a very different one to the one we went with: originally we were going for a metallic and shiny demo with a completely different atmosphere. However, we were concerned as some core tech we would need, was not present when we started (for example in engine cube map generation). This and the other effects we wanted to do, would mean a lot of required code work for GRX. So instead, we decided to do something we had not really done yet: a fantasy style wizard's tower (we moved away from the "tower" aspect quickly in the process).
By the end of January Zonbie had built a storyboard and we decided on initial timings for Response to use for the music sync. We had met Response of Darklite a couple of years back, but at Solskogen 2013 Response offered to make the soundtrack for our next demo. As we really liked his music we were happy to have him contribute to this year's PandaCube demo. A few weeks after we sent the storyboard to Response, he gave us an early version of the soundtrack. This allowed us to nail down the timings of the scene transitions so that they fit to the music. The first iteration of the music for scene 5 (credits) was a bit too dark and depressing and got replaced by the music that made it into the final version. Response was polishing the music right up to the Easter weekend. The Soundtrack was made using FLStudio with a combination of samples and VST's. Using a macro, Response exported out a midi version of the tune with each rendering. This was very useful for exact timings (for sync) and the integration of the tune into the demo. By the end of the production the tune had been exported 59 times with both midi and mp3.
The storyboard was built on a simple idea involving a wizard who miscast a spell. There were some elements that changed during production, notably scene 4, which was rebuilt as the original idea did not really work. Scene 4 went from floating tiles to a floating platform with chains, as the floating tiles ended up looking too sparse and uninteresting.
Both, scene 1 and 5, were originally planned to only contain the book, but needed some more work as they were too boring by themselves. So scene 1 got its own room and scene 5 got a floating platform chamber.
For every big PandaCube demo we go back to the production of the last demo and look at framework deficits that became apparent. We identified that our framework is fairly flexible but the iteration times were pretty slow. For PC-09 we wanted to decrease loading times and make in-engine changes instantaneous. Up to this point all PandaCube demos had been single threaded. This was not a huge deal, as we were most of the time GPU bound and any parallelization on the CPU side would lead to little performance gain. With the addition of Hugin as a second Programmer to the PandaCube group, we had some additional code resources to spend on framework improvements. Hugin implemented the threading abstraction layer, which was then used to multi thread all texture and model loading. This improved the loading times from 60 seconds to 20 seconds in Debug. For further improvements we decided to dodge the expensive xml parsing code from our Collada loader by implementing a serialization / deserialization scheme for model resources. On first load we serialize down to the hard drive the loaded Collada model. Any subsequent load would directly load the serialized binary. This made it possible to reduce the final loading times to less than 2 seconds.
From the very beginning the PandaCube framework supported to automatically load text based interpolation files that represent cubic b splines or linear interpolations. These files had to be edited by hand in a text editor and then reloaded by pressing a button while running the demo. This made adjusting values like the Depth of Field focus plane a time intensive and error prone task. To improve our iteration times we decided to implement a 2D interpolation editor that would reside in a second window on screen.
For this to work, the rendering window needed to support ad-hoc resizing. The added benefit we got out of this change was the support of high resolution screenshots that upscale the rendering device to resolutions higher than the current screen resolution, rendering one frame of the demo and then saving the back buffer to a png file on disk. The maximum resolution is theoretically 16K x 16K but the limiting factor will in most cases be the available GPU memory. Currently our high res Screenshots are saved out in 8K x 4K resolution.
The 2D Interpolation Editor allows us to change any interpolation currently loaded in an immediate way: the change to the spline in the editor directly affects the rendering of the Demo in the primary window. Adding and removing points to the Interpolation by simply clicking in the display part of the Editor improved spline creation times dramatically. We added some extra support for the creation of new cameras from scratch. It allowed to create a camera on a linear path from a start to an end point. In a second step we would move the pre-positioned points into a nice curve using our in-engine positioning tools. The initial pass on creating all the cameras for PC-09 took only one afternoon. This is down from about 2 days for the PC-07 demo.
In addition to the load time improvements, the addition of the 2D Spline Editor was the biggest workflow improvement. What took way too long during the production of PC-07 and PC-08 (animating lights, object position animation, lighting) took no time in comparison for this demo. In fact, without the spline tool we would not have been able to release this demo in time. Depth of field was something that took a long time before, now a pass on the whole demo took about an hour.
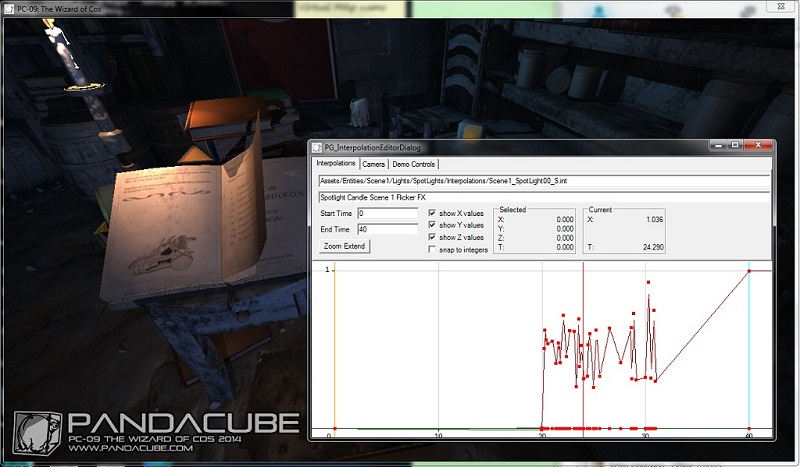
The spline editor allowed moving through the scene fast and finding the exact time when to change a certain value. Time stamps can be easily added and removed to our interpolations, making it fast to do anything from animating lights and FX to changing fog and tweaking the positions of props. The Editor allowed for experimentation, something that in previous demos was very time consuming.
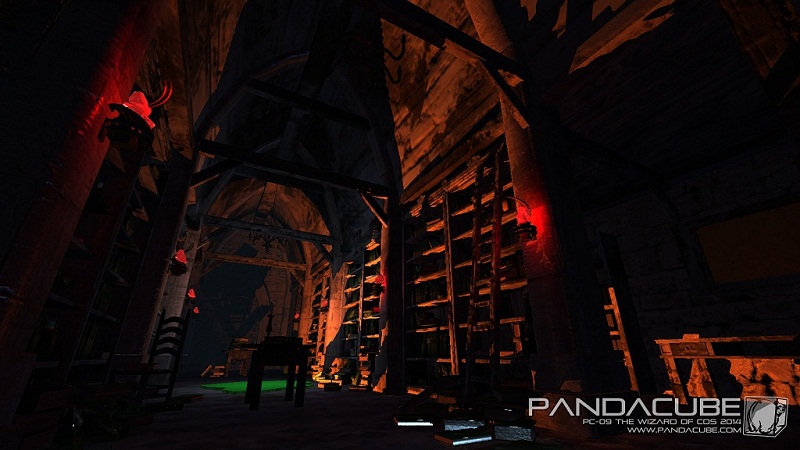
One of the main requirements from the art side was a lot of books. In the first three scenes they are a frequent prop. To build them, a mask shader was used to mask in the etchings and any text on them. This meant adding a few more triangles per book, but we were able to reduce the draw calls to only two – one for the "paper sides" of the book pages and another for the hardcover.
Bind pose of the animated Book in scene 1 and 5
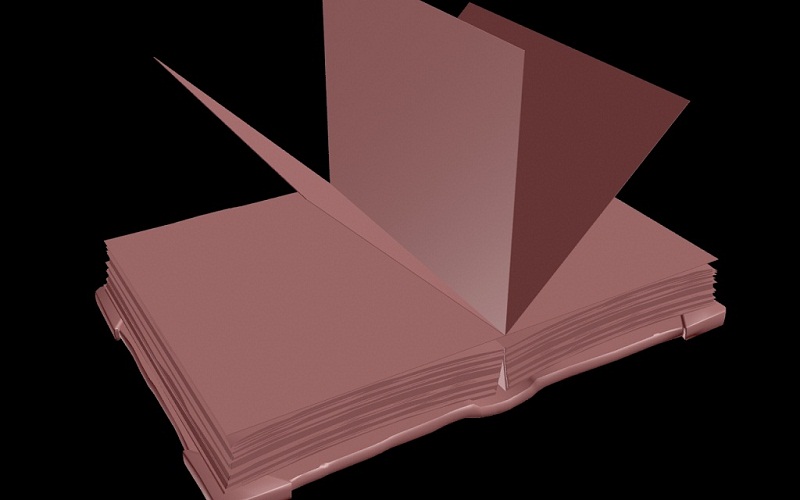
Four book types were made, including a higher poly book for the page turning prop. This was built and textured by Zonbie, then skinned and animated by Tarcus. The high poly prop used the same shader setup as the other books. Geekchicalex made the illustrations to accompany the text in scene 1 and 5. Illustrations and text use the same mask texture.
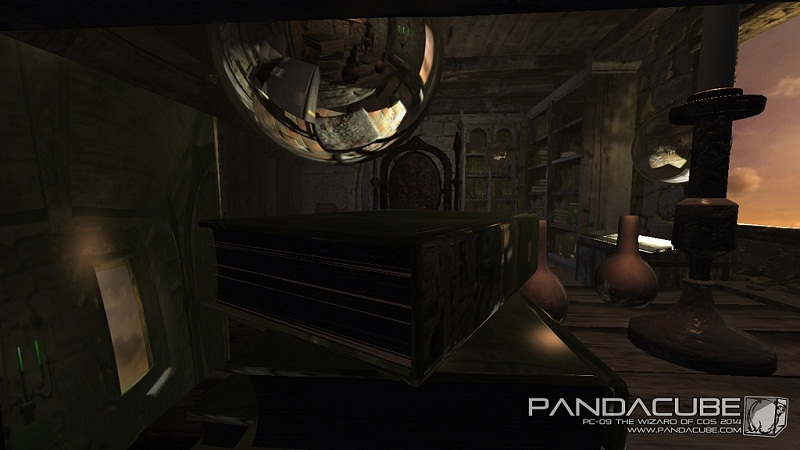
A fun part was coming up with suitable book titles and "authors" for the greetings scene in the library. Because of the mask technique it was very easy to change and modify the book titles. Memory wise it was not too expensive either. For most textures we use the PNG texture format. The engine uses DirectX loading routines and therefore supports all the standard texture formats including DXT compressed DDS textures. For textures with little variation in them the PNG textures tend to be smaller than the DXT compressed equivalents. In regards to textures we are normally more concerned about the disk footprint than the allocated memory as we target primarily the high end compo machines as platform. A handful of small features have been added to the rendering framework for this production. We changed our specular lighting model to Blinn-Phong, which results in more ellipse formed specular lobes. We replaced the old DirectX 10 Math library with the SIMD optimized DirectX Math library that ships with DirectX 11. The transition took way more time than expected, as it was not a straight forward search and replace. A couple of new errors got introduced during the replacement that broke for example the skinned animation pipeline. Overall the replacement took over a week (including the bug fixes) but resulted in a small performance gain. Another smaller addition is the possibility to place markers within the Demo that allow the creation of cube maps rendered out from the Demo. This way, many cube maps with different resolutions can be placed around the scene. Each cube map has its own life time and radius of influence. Up to 8 cube maps can be active at the same time. When a shader wants to sample the environment map, it evaluates, which of the up to 8 cube maps influence spheres cover the current world position. The closest cube map will then be sampled. One of the 8 cube maps serves as default cube map, which will be used, if none of the other covers the current position. This allowed Zonbie to use reflective materials where appropriate. As the cube maps were rendered by the engine, they were very accurate. They could be switched out during playback, when for example the lighting had changed dramatically. All materials of PC-09 had some degree of reflectivity.
It took Zonbie a week to have all scene geometry built and another week to get most of the modelling work done. Most time is usually spent on polish, however all the scenes were up and running quickly. He then does texturing, material setup and mask blending after the basic setup is done. Any Ambient Occlusion baking happens near the end of the deadline, when the geometry will not change anymore.
Building the scene is a quite quick process now, with low-poly placeholder geometry in the correct size and layout coming in early. These placeholders then get replaced with final geometry one after the other. This allows for other demo elements (like camera paths) to be built in parallel.
TWL built a set of nice dribbly candles that were used in every scene besides scene 4. Each candle was built as a high poly model that was used to bake down a normal map for a lower poly version used in the demo. For the candle flame TTT created an animated texture effect. Two textures with 64 animation steps each were used: One for the ignition sequence in scene 1 and a looping texture that was used for every candle flame. We used different starting offsets for each flame to make the reuse less apparent.
The portrait painting in scene 2 was speed painted by Zonbie in a fairly low resolution. A second "evil" version was then made and we used a mask to blend them over time. The mask defines which areas get blended first and which areas switch at the end of the transition period.
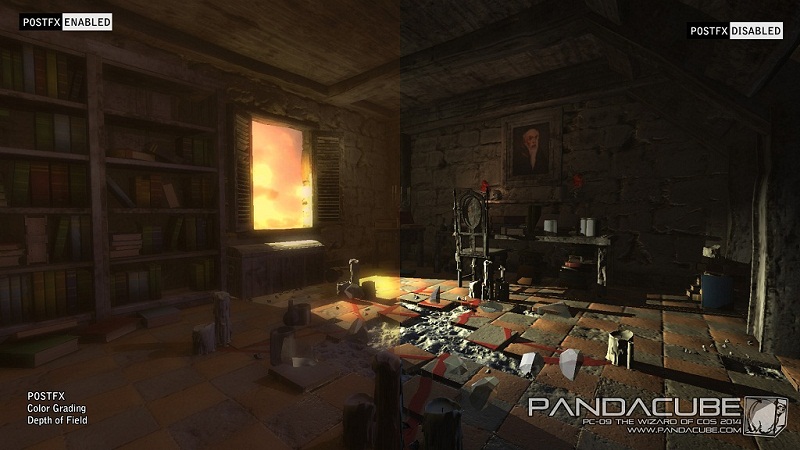
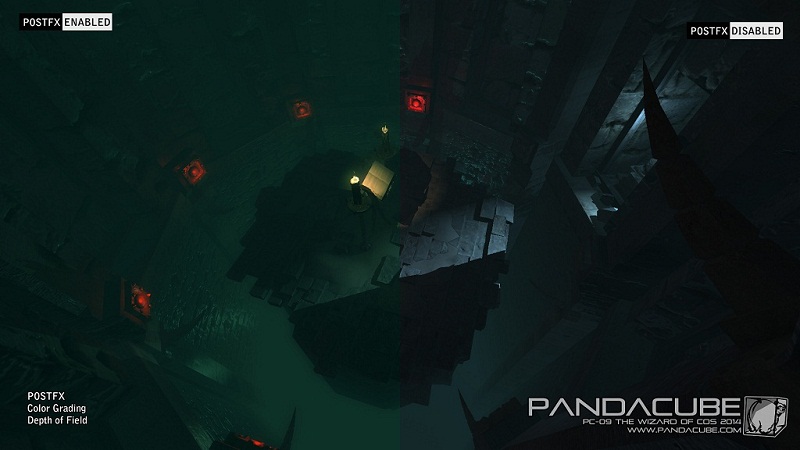
We have had color grading before in our demos (it was first implemented for PC-06), however it has been underused since then. So for PC-09 we used the color grading to push the dynamic range up (as well as gamma) to help show darker parts of a scene better on a projector. For Scene 5 and even Scene 4, the color grading was also used to great effect to tint the scene with a slight color bias, green for example in Scene 5.
One of the main new rendering effects for PC-09 is an order independent transparency effect. It allows for up to 32 overlapping alpha transparent triangles that do not need to be sorted before rendering. The algorithm is based on per pixel linked lists that use Structured Unordered Access Buffers. Each of the per-pixel linked lists get sorted in a final full screen pass and then normally alpha blended back-to-front. These new structured buffers allow scatter writes between the different thread groups that work on the rasterized fragments.
Unfortunately this new feature of DirectX 11 is not very well supported by tools like AMD's GPUPerfStudio or Intel's GPA, which makes debugging of effects based on it quite difficult (writing to these buffers is not as easy to debug as normal render target writes). All glitches and graphical corruptions of the party version seem to be caused by a buggy implementation (by GRX) of these per pixel linked lists.
The second big rendering effect is a (theoretically) pixel perfect meta ball effect that can render huge amounts of meta balls at the same time. Similarly to the order independent transparency effect, it is based on per pixel linked lists. It is based on the paper "Real-Time Metaball Ray Casting with Fragment Lists" by "L. Szécsi and D. Illés" from 2012. Each meta ball is represented by a position and a radius of maximum influence. For each meta ball a quad is rendered to the screen. The applied shader writes out a depth value that adjusts it to a sphere, discarding any pixels that do not intersect with the influence sphere. Any pixels that do not get discarded, calculate their distances along the ray from the camera position to the fragment getting rendered: entry point, mid-point (highest influence) and exit point of the influence sphere. These triplets are stored in the per-pixel linked lists. In the final full screen quad pass, the individual values from the triplets of the per-pixel linked lists get sorted along the view ray. The values effectively segment the view ray. For each of the segments a cubic function is defined and solved, to check if an intersection with the meta ball has been found. This description is only a simplified version of the full algorithm; check the paper, if you want to find out more about it. It turned out, that GRX had underestimated the amount of work that goes into the implementation of this effect. It took 9 days to implement this algorithm and we only got it working (with glitches) one day before the Revision party started.
Because the iteration times are quite huge for shader changes, we were not able to debug these effects during the Revision party (on our less powerful Laptops). This seems to be the most pressing deficit of the PandaCube framework at the current time. We plan to implement a new shader system in the near future.
For the 4th scene of the PC-09 demo, we wanted to have a flock simulation to drive the black meta balls that are flying around in the background. A simple boids simulation was implemented that makes each individual flock follow a target that is animated by a spline. The simulation is run at an update rate of 120 steps / second to prevent a low rendering frame rate to affect the visual end result. The whole simulation only got added to the demo during the extensive party hacking at Revision. Unfortunately we were running out of time and the boids simulation did not get the proper tweaking of all the variables. This resulted in too fast moving meta balls that look like bouncing around a moving target. I hope to improve this for the final version that we want to release a couple of weeks after Revision.
Links related to this article
Pandacube youtube channel with all Pandacube demos
All Pandacube demos at Pouet.net
GRX, Response & Zonbie of PandaCube